Thursday, August 30, 2012

Reset Portlet Action-scoped Request Attributes

JSR 286 provides a container runtime option javax.portlet.actionScopedRequestAttributes that when set to true allows portlets set complex objects as request attributes from the processAction method for subsequent rendering.

Based on the spec, action-scoped request attributes are kept in the session until are reset in the next action or session timeout. The reset can be done in different ways:

1) In portlet processAction method, call request.setAttribute(attributeName, null);, this call removes the attribute with the given name.

2) Build a portlet renderURL with a parameter that has name as javax.portlet.as and an empty string value, as shown in below. All action-scoped request attributes will be removed once the renderURL is invoked.

<portlet:renderURL var="refreshURL">
  <portlet:param name="javax.portlet.as" value="" />
</portlet:renderURL>

Apache Tiles 2.2 error handling in Websphere Application Server 7

When using Apache Tiles 2.2 in Websphere 7 application, by default the JSP engine renders the response tile-by-tile. When exception happens in one tile and there is error page defined, only the offending tile is rendered with the error page, the others are just rendered fine.

To change this behaviour to allow exceptions to bubble up to the including JSP and forwad to the error page, there are two things need to be done:

1) Set the container custom property com.ibm.ws.webcontainer.dispatcherRethrowSError to true. This property is avaiable from WAS Fixpack 7.0.0.15. Details can be found from http://www-01.ibm.com/support/docview.wss?uid=swg1PM22919 and http://pic.dhe.ibm.com/infocenter/wasinfo/v7r0/index.jsp?topic=%2Fcom.ibm.websphere.express.doc%2Finfo%2Fexp%2Fae%2Frweb_custom_props.html.

2) Define an errorPage for the template jsp, as shown in below.

<%@ page errorPage="/jsp/general/error.jsp" %>

<%@ taglib uri="http://tiles.apache.org/tags-tiles" prefix="tiles" %>

<tiles:insertAttribute name="header" />

<tiles:insertAttribute name="body" />

<tiles:insertAttribute name="footer" /> 

Wednesday, July 11, 2012

Websphere Portal Cross-Site-Scripting Protection

Websphere Portal version 7 provides a Cross-Site-Scripting protection mechanism that encodes the "<" and ">" during form post. This protection mechanism is turned on by default. As a consequence, the request values passed to the portlet processAction method are encoded values. e.g. "&lt;" for "<" and "&gt;" for ">", thus a Html unescape call is required to retrieve the original input values.

To disable the Cross-Site-Scripting protection, the security.css.protection service configuration property value needs to be set to false using procedure described in http://www-10.lotus.com/ldd/portalwiki.nsf/dx/Setting_service_configuration_properties_wp7.

Friday, June 22, 2012

Develop a Hello World ESB Java Service using WebSphere Integration Developer 7

This note summarise the development of a Hello World ESB Java service using WebSphere Integration Developer 7.0.

Step 1 - Build the ESB Java service

1.1) In WebSphere Integration Developer 7.0 workspace, switch to Business Integration Perspective.

1.2) In file menu, select File - New - Module, use HelloWorldServiceModule as the Module name and click Finish.

1.3) Under the HelloWorldServiceModule project, right click Interfaces, and select New - Integerface, use HelloWorldInterface as the interface name, then click Finish.

1.4) In the interface editor, right click and select Add Request Response Operation, use hello as operation name, and message as the input, response as the output, both with string type. Save the changes.

1.5) Switch to the Assembly Editor, drag and drop a Java component from the Palette to the Assembly Editor, name it HelloWorldService.

1.6) Right click the HelloWorldService and select Add - Interface, select HelloWorldInterface.

1.7) Right click the HelloWorldService and select Generate Implementation, create a new package demo.

1.8) In the HelloWorldServiceImpl Java editor, implemention the hello method as the code below, save changes.

/**
 * Method generated to support implementation of operation "hello" defined for WSDL port type 
 * named "HelloWorldInterface".
 * 
 * Please refer to the WSDL Definition for more information 
 * on the type of input, output and fault(s).
 */
public String hello(String message) {
 return "Hello:" + message;
}

1.9) Switch to the Assembly Editor, drag and drop a References component from the Palette to the Assembly Editor.

1.10) Right click the Stand-alone References, and select Add Reference, then select HelloWorldInterface

1.11) Link the Stand-alone References to HelloWorldService, save changes.

Step 2 - Build the ESB client

2.1) Switch the Java EE perspective.

2.2) Right click the HelloWorldServiceModuleWeb project, and select New - JSP, use client.jsp as the File name, then click Finish.

2.3) Add the code below to the client.jsp page, save changes.

<%@ page language="java" contentType="text/html; charset=ISO-8859-1"
    pageEncoding="ISO-8859-1"%>
<%@ page import="com.ibm.websphere.sca.*,commonj.sdo.DataObject" %>
    
<!DOCTYPE html PUBLIC "-//W3C//DTD HTML 4.01 Transitional//EN" "http://www.w3.org/TR/html4/loose.dtd">
<html>
<body>

<%
String serviceOutput = "N/A";
String message = request.getParameter("message");
if(message != null){
 try{
  ServiceManager serviceManager = new ServiceManager();
  Service service = (Service) serviceManager.locateService("HelloWorldInterfacePartner");
  DataObject respObject = (DataObject) service.invoke("hello", message);
  serviceOutput = respObject.getString("response");
 }catch(Exception e){
  e.printStackTrace();
 }
}
%>

Service Output : <%= serviceOutput %>

<form method="post">
 <input type="text" NAME="message"/>
 <input TYPE="submit"/>
</form>

</body>
</html>

Step 3 - Build and run the application

3.1) Switch to Business Integration Perspective, right click the HelloWorldServiceModule, select Export and Integration modules and libraries - Files for server deployment

3.2) Deploy the generated EAR file to Websphere Process Server.

3.3) Access the client.jsp from browser to test the application.

Thursday, June 14, 2012

Develop a Hello World Business Integration Application using WebSphere Integration Developer 7

This note summarise the development of a Hello World Business Integration application using WebSphere Integration Developer 7.0. The demo application reads simple CSV files from the input directory and then writes the data to the output directory in XML format.

Step 1 - Install WebSphere Integration Developer 7.0

Install IID 7.0.0.4 and local Websphere Process server test environment.

Step 2 - Build the Hello World Business Integration application

2.1) Create a new module, from menu select File - New - Module, and uses SimpleFileModule as module name.

2.2) Use the default Business Object Parsing Mode, and click Finish. Once the module is created, the Assemble Diagram view is displayed

2.3) Under the SimpleFileModule, right click the Data Types node to create a new Business Object.

2.4) Enter Customer as the Business Object name, click Next

2.5) Click Finish on the Derived Business Object screen

2.6) Now the Business Object editor screen is displayed

2.7) Click the Add Field icon to add fields to the Customer Business Object.

2.8) Add a string field name and an int field age, then save changes.

2.9) Right click the SimpleFileModule and select New - External Service

2.10) Select Simple inbound Flat File service to read from a local file, click Next.

2.11) Use the default values on the Flat File service name screen and click Next.

2.12) Now the CWYFF_FlatFile project is imported to the workspace. On the Business object and directory screen, select the Customer Business object and the input directory. Click Next.

2.13) Select Other as the input format and select the CSVDataHandler

2.14) Use "\n" as the file split delimiter, click Next.

2.15) Select the local archive directory, click Finish.

2.16) The FlatFileExport interface is now added to the Assemble Diagram.

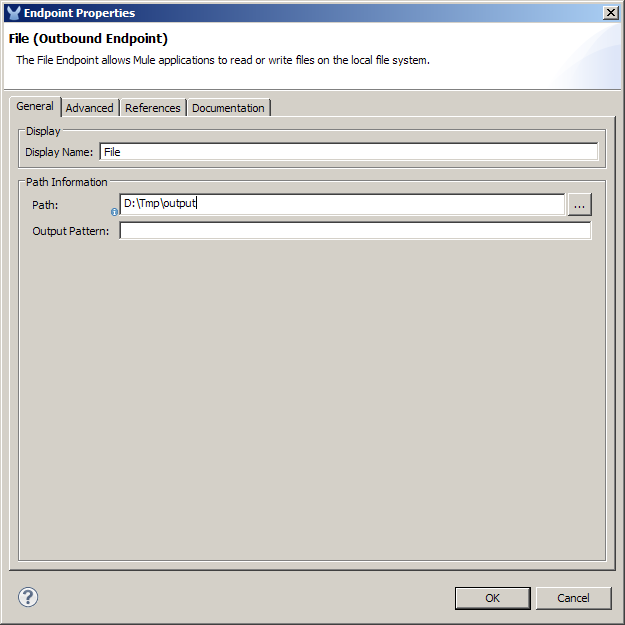
2.17) Right click the SimpleFileModule and select New - External Service to add a Simple outbound Flat File service to write to a local file, click Next.

2.18) Use the default values on the Flat File service name screen and click Next.

2.19) On the Business object and directory screen, select the Customer Business object and the output directory, click Next.

2.20) Set the output file to Customer.xml and use other default values on the Output file name screen, click Next.

2.21) Select XML output format, click Finish.

2.22) The FlatFileImport interface is now added to the Assemble Diagram.

2.23) Drag and drop a Mediation Flow from the Assemble Diagram Palette to the Assemble Diagram editor.

2.24) Name the Mediation Flow to SimpleFileFlow

2.25) Double click the SimpleFileFlow and click Yes on the confirmation message box.

2.26) Use the default value on the Generate Implementation screen and click OK.

2.27) Now the SimpleFileFlow editor is open.

2.28) Click the Add an interface link and select FlatFileExport.

2.29) Click the Add a reference link and select FlatFileImport.

2.30) Save changes.

2.31) Click the emit link from FlatFileExport, then select Operation Map.

2.32) Select the default values on the Select Reference Operation screen, click OK.

2.33) The Mediation Flow Request editor is open.

2.34) Double click the input_map node, use default values on the Create an XML Map screen and click Next.

2.35) Use default values on the Specify Message Types screen and click Finish.

2.36) Now the map editor is open, expand the emit link and the create link.

2.37) Link the emitInput and the createInput with a Move transformation.

2.38) Save all changes and back to the Assemble Diagram editor, link the FlatFileExport to SimpleFileFlow, then SimpleFileFlow to FlatFileImport, save changes.

Step 3 - Testing the module

To run the module, right click the local Process Server and select Add and Remove Projects.

Then add the SimpleFileModuleApp to the Configured projects list, and click Finish.

Start the Process Server, and check the SimpleFileModuleApp is started and synchronized.

Copy a CSV file to the input directory, the file should have a format as shown in below

Peter,20
Tom,21
Emma,22
Julia,23

After a few seconds, the application reads the input CSV file and output few output XML files to the output directory, the input file is archived to the archive directory with a .success or .fail extension. The generated XML file has a format as shown in below.

<?xml version="1.0" encoding="UTF-8"?>
<p:Customer xsi:type="p:Customer" xmlns:xsi="http://www.w3.org/2001/XMLSchema-instance" 
 xmlns:p="http://SimpleFileModule">
 
 <name>Tom</name>
 <age>21</age>
</p:Customer>

Spring MVC3 Portlets with Websphere Portal 7 Client Side Aggregation

This note summarises the Action ID missing issue and solution found when running Spring MVC3 portlets with Websphere Portal 7 Client Side Aggregation (CSA).

The issue can be reproduced with a simple Spring portlet as shown in below. When the form is submitted, the "This portlet is unavailable" message is displayed, and the ffdc log shows an Action ID missing error message.

<%@page
    language="java" contentType="text/html; charset=ISO-8859-1"
    pageEncoding="ISO-8859-1" session="false"%>
    
<%@taglib prefix="c" uri="http://java.sun.com/jsp/jstl/core" %>   
<%@taglib prefix="spring" uri="http://www.springframework.org/tags"%> 
<%@taglib prefix="form" uri="http://www.springframework.org/tags/form"%>
<%@taglib prefix="portlet" uri="http://java.sun.com/portlet_2_0"%>

Hello ${demoBean.message}

<portlet:actionURL var="actionURL"/>

<div>

<form:form action="${actionURL}"  method="post" modelAttribute="demoBean">
 <form:input size="20" path="message" />
 <input type="submit"/>
</form:form>  

</div>

[30/05/12 16:53:06:418 EST] 0000004e PortletInvoke W com.ibm.wps.wsrp.producer.provider.pc.waspc.impl.PortletInvokerImpl 
 newBlockingInteractionResponse Action execution refused due to a security violation. Action ID missing.
[30/05/12 16:53:06:425 EST] 0000004e WSRPEngine    E com.ibm.wps.wsrp.producer.impl.WSRPEngine performBlockInteraction 
 EJPWC1109E: Normal execution of the operation failed.
 com.ibm.wps.wsrp.exception.WSRPException: EJPWC1109E: Normal execution of the operation failed.
 at com.ibm.wps.wsrp.producer.provider.pc.waspc.impl.PortletInvokerImpl.handleActionProtection(PortletInvokerImpl.java:1083)
 at com.ibm.wps.wsrp.producer.provider.pc.waspc.impl.PortletInvokerImpl.invokePerformBlockingInteraction(PortletInvokerImpl.java:833)
 at com.ibm.wps.wsrp.producer.provider.pc.impl.PortletInvokerImpl.invokePerformBlockingInteraction(PortletInvokerImpl.java:170)
 at com.ibm.wps.wsrp.producer.impl.WSRPEngine.performBlockingInteraction(WSRPEngine.java:833)
 at oasis.names.tc.wsrp.v2.bind.WSRP_v2_Markup_Binding_SOAPImpl.performBlockingInteraction(WSRP_v2_Markup_Binding_SOAPImpl.java:213)
 at sun.reflect.NativeMethodAccessorImpl.invoke0(Native Method)
 at sun.reflect.NativeMethodAccessorImpl.invoke(NativeMethodAccessorImpl.java:39)
 at sun.reflect.DelegatingMethodAccessorImpl.invoke(DelegatingMethodAccessorImpl.java:25)
 at java.lang.reflect.Method.invoke(Method.java:597)
 at com.ibm.ws.webservices.engine.dispatchers.java.JavaDispatcher.invokeMethod(JavaDispatcher.java:178)
 at com.ibm.ws.webservices.engine.dispatchers.java.JavaDispatcher.invokeOperation(JavaDispatcher.java:141)
 at com.ibm.ws.webservices.engine.dispatchers.SoapRPCProcessor.processRequestResponse(SoapRPCProcessor.java:481)
 at com.ibm.ws.webservices.engine.dispatchers.SoapRPCProcessor.processMessage(SoapRPCProcessor.java:427)
 at com.ibm.ws.webservices.engine.dispatchers.BasicDispatcher.processMessage(BasicDispatcher.java:134)
 at com.ibm.ws.webservices.engine.dispatchers.java.SessionDispatcher.invoke(SessionDispatcher.java:204)
 at com.ibm.ws.webservices.engine.PivotHandlerWrapper.invoke(PivotHandlerWrapper.java:263)
 at com.ibm.ws.webservices.engine.handlers.jaxrpc.JAXRPCHandler.invoke(JAXRPCHandler.java:153)
 at com.ibm.ws.webservices.engine.handlers.WrappedHandler.invoke(WrappedHandler.java:64)
 at com.ibm.ws.webservices.engine.PivotHandlerWrapper.invoke(PivotHandlerWrapper.java:263)
 at com.ibm.ws.webservices.engine.PivotHandlerWrapper.invoke(PivotHandlerWrapper.java:263)

Look at the portlet page html source, the form action attribute values is a Websphere Portal javascript in which the portlet action URL is encoded.

<form method="post" action="javascript:
    com.ibm.portal.csa.PortletIWidget.Z7_EIH60VH40GNPF0ITR3BKO410I2.onActionLink(
      com.ibm.portal.csa.PortletIWidget.Z7_EIH60VH40GNPF0ITR3BKO410I2.urls.url0.tokens);" 
  id="demoBean">
 <input type="text" size="20" value="" name="message" id="message">
 <input type="submit">
</form>

This solution is to add a htmlEscape attribute to the spring form tag and set its value to false to disable html escape so that the portal engine can encode the action URL correctly.

<form:form action="${actionURL}"  method="post" modelAttribute="demoBean"
 htmlEscape="false">
  ...   
</form:form>

The solution is verified in Websphere Portal 7.0.0.2 with WAS Application Server 7.0.0.21 and Spring MVC 3.1.0.

Thursday, May 10, 2012

Building AJAX-enabled JSF Portlets in IBM WebSphere Portal 7

This note summarise different approaches to implement an AJAX-enabled JSF portlet in IBM WebSphere Portal 7. The portlet used in the demo has a simple UI that consists of two elements, one list box that has two items and one text label. When AJAX is enabled to the portlet, once the list box selected item changes, an AJAX request is sent to refresh the text label.

Implementation 1 - IBM JSF Portlet bridge 1.2 with IBM JSF Extension Components

IBM WebSphere Portal 7 comes with a JSF Portlet bridge 1.2 that supports JSF 1.2 based portlet development. As JSF 1.2 doesn't have built-in AJAX support, IBM JSF Extension Components are used to provide AJAX functionalities, as shown in the code below

<%@taglib uri="http://java.sun.com/jsf/core" prefix="f"%>
<%@taglib uri="http://java.sun.com/jsf/html" prefix="h"%>
<%@taglib uri="http://java.sun.com/portlet_2_0" prefix="portlet"%>
<%@taglib uri="http://www.ibm.com/jsf/html_extended" prefix="hx"%>

<%@taglib
  uri="http://www.ibm.com/xmlns/prod/websphere/portal/v6.1/portlet-client-model"
  prefix="portlet-client-model"%>
<%@page language="java" contentType="text/html"
  pageEncoding="ISO-8859-1" session="false"%><portlet:defineObjects />
<portlet-client-model:init>
  <portlet-client-model:require module="ibm.portal.xml.*" />
  <portlet-client-model:require module="ibm.portal.portlet.*" />
</portlet-client-model:init>
<f:view>
  <hx:scriptCollector id="scriptCollector1">
    <h:form styleClass="form" id="form1">
      <h:selectOneListbox id="listbox1">
        <f:selectItem itemLabel="Label1" 
          itemValue="Value1" id="selectItem1" />
        <f:selectItem itemLabel="Label2" 
          itemValue="Value2" id="selectItem2" />
      </h:selectOneListbox>
      <hx:behavior event="onchange" target="listbox1" 
        behaviorAction="get" targetAction="group1"></hx:behavior>
    </h:form>
    <h:panelGroup styleClass="panelGroup" id="group1">
      <h:outputText styleClass="outputText" id="text1"
      value="Hello, #{param.listbox1} "></h:outputText>
    </h:panelGroup>
    <hx:ajaxRefreshRequest target="group1" 
      id="ajaxRefreshRequest1"
      params="listbox1">
    </hx:ajaxRefreshRequest>
  </hx:scriptCollector>
</f:view>

Implementation 2 - JSF 2.0 Portlet Bridge for IBM WebSphere Portal

There is a JSF 2.0 Portlet Bridge for IBM WebSphere Portal available from Greenhouse Lotus that allows developing portlets based on JSF 2.0 specifications with MyFaces 2.0. With JSF 2.0 build-in AJAX support, the demo can be implemented as JSF code shown in below.

<div xmlns="http://www.w3.org/1999/xhtml" 
 xmlns:ui="http://java.sun.com/jsf/facelets" 
 xmlns:f="http://java.sun.com/jsf/core"
 xmlns:h="http://java.sun.com/jsf/html" 
 xmlns:portlet="http://java.sun.com/portlet_2_0"  >
<f:view>
  <h:form> 
    <h:selectOneListbox styleClass="selectOneListbox" 
      id="listbox1" value="#{testBean.text}">
      <f:selectItem itemLabel="Label1" itemValue="Value1"/>
      <f:selectItem itemLabel="Label2" itemValue="Value2"/>
      <f:ajax render="text1" execute="@this"/> 
    </h:selectOneListbox>
    <h:outputText id="text1"
      value="Hello, #{testBean.text} ">
    </h:outputText>
  </h:form>
</f:view>
</div>

Implementation 3 - ICEfaces Enterprise Edition (EE) 3.0

ICEfaces Enterprise Edition 3.0 provides a PortletFaces Bridge Extensions library that supports JSF 2.0 based portlets on WebSphere Portal 7. The demo can be implemented using the same JSF code as Implementation 2 above with MyFaces 2.0 or Mojarra 2.1, additional change required is add the container runtime option below in portlet.xml.

<container-runtime-option>
  <name>javax.portlet.renderHeaders</name>
  <value>true</value> 
</container-runtime-option>

All three implementations are tested in WebSphere Portal 7.0.0.2 and WAS 7.0.0.19 with different theme and render modes, the results are summarised in the table below.

Implementation Page Builder theme - SSA Page Builder theme - CSA Portal theme - SSA only Notes
IBM JSF Portlet bridge 1.2 with IBM JSF Extension Components works as expected The portlet is rendered but AJAX doesn't work, no Javascript errors works as expected  
JSF 2.0 Portlet Bridge for IBM WebSphere Portal (MyFaces 2.0) works as expected works as expected works as expected The library is provided as is, with no support from IBM
ICEfaces Enterprise Edition 3.0 (MyFaces 2.0/Mojarra 2.1) works as expected The portlet is unable to render with exceptions from the bridge The portlet is rendered but AJAX doesn't work with Javascript errors Commercial license required

Monday, May 7, 2012

RAD Application Server Publishing settings and WTP based Maven Projects


The WebSphere Application Server publishing setting in RAD has two options: 1) Run server with resources within the workspace, and 2) Run server with resources on Server. When perform "Run/Debug on Server", with the "within the workspace" option, applications run from the workspace, while with the "on Server" option, applications are deployed to Application Server first and then run from the server.

When there is a local application server is available, the "within the workspace" option is the default and it takes less publishing time compare to the "on Server" option. However, it may not work with WTP based Maven projects that have "Workspace Resolution" enabled.

Given a Maven project that consists of two modules - core and web, when perform "Run/Debug on Server" with Maven "Workspace Resolution" enabled and the "within the workspace" option selected. RAD doesn't publish the core jar file to the workspace publishing folder (e.g. .metadata\.plugins\org.eclipse.wst.server.core\tmp1\), and uses two different class loaders to load the core jar and the web application, thus causes class loading related issues, examples include

- spring xml in the web module cannot import spring xml from core module using <import resource="classpath:com/test/resources/spring-core-beans.xml" />

- the web module cannot load resources from core module using ResourceBundle.getBundle(baseName)

An easy solution to these issues is to use the "Run server with resources on Server" publishing settings.

Friday, May 4, 2012

Using WAR File Name as uid in XMLAccess based Portlet Deployment

For portlets that don't have id attribute defined in <portlet-app> tag in portlet.xml, XMLAccess allows to use the WAR file name as uid in XMLAccess request.


<request
    xmlns:xsi="http://www.w3.org/2001/XMLSchema-instance"
    xsi:noNamespaceSchemaLocation="PortalConfig_7.0.0.xsd"
    type="update"
    create-oids="true">

    <portal action="locate">
        <web-app action="update" active="true" uid="WAR_NAME.webmod">
           <url>file:///PATH_TO_THE_WAR_FILE</url>
           <portlet-app action="update" active="true" uid="WAR_NAME">
              <portlet action="update" active="true" name="TestPortlet" objectid="theTestPortlet" />
            </portlet-app>
        </web-app>
    </portal>
</request>

The script works fine when install a new portlet, however when re-run the same script to update the portlet, it gives a DuplicateAppException that complains EJPPF0181E The id=XXX already exists for stored standard portlet application.


The solution to this problem is to add a uniquename attribute to the <web-app> in XMLAccess script, as shown in below


<request
    xmlns:xsi="http://www.w3.org/2001/XMLSchema-instance"
    xsi:noNamespaceSchemaLocation="PortalConfig_7.0.0.xsd"
    type="update"
    create-oids="true">

    <portal action="locate">
        <web-app action="update" active="true" uid="WAR_NAME.webmod" uniquename="SOME_UNIQUE_NAME">
           <url>file:///PATH_TO_THE_WAR_FILE</url>
           <portlet-app action="update" active="true" uid="WAR_NAME">
              <portlet action="update" active="true" name="TestPortlet" objectid="theTestPortlet" />
            </portlet-app>
        </web-app>
    </portal>
</request>

Now the script can be used to install a new portlet and also to update an existing portlet based on the uniquename attribute value.

Tuesday, April 3, 2012

Using URL Rewrting for Session Tracking in IBM WebSphere Application Server

My recent application has two access interfaces; the first one in a normal Web interface that end users access to using browsers, the second one is a servlet based B2B interface that business partners access to using their in-house applications. Session tracking is required for both the interface, for Web interface, normal cookies based session tracking mechanism is used; while for B2B interface, as the client applications don't support cookie, URL rewriting based session tracking mechanism is used.
In order to use URL rewriting, B2B client applications must include jsessionid in its request URL. In the current implementation, when a B2B client applicaiton access the application first time, a jsessionid is output to the client, then the jsessionid is used in following requests.

The implementation of the URL rewriting in WAS consists of two parts.
Firstly, the URL rewriting must be enabled in the application session management. When both cookie and URL rewriting are enabled, WAS by default will use cookie when requests come from clients that have cookie enabled.


Secondly, the application must include the jsessionid in the response. Through the HttpSession interface provides a getId method that returns a unique identifier assigned to this session, but in WAS, the return value is only part of the jsessionid string. Currently I use the response.encodeURL method to generate a encoded URL that has a format like ...;jsessionid=0000qA9CUpmesNP-MLxR3KoXeaM:-1, from which the jsessionid is extracted using substring methods.

Thursday, March 29, 2012

Mule Studio Hello World ESB Application

This note summarise the development of a Hello World ESB Application using Mule Studio.
Step 1 - Download and install Mule Studio
Download the Mule ESB Community Edition from www.mulesoft.org and save the distribution package zip file.
There is no installation required. Just unzip the package to local drive and we are ready to go.

Step 2 - Launching Mule Studio
Navigate to the directory that contains the muleStudio.exe executable.
Launch the muleStudio.exe to start the application.
Specify the workspace location on the Select a workspace screen.


Step 3 - First Steps
The First Steps screen is displayed if the selected workspace is a new one.
Click Go to Mule Studio to start using the application.


Step 4 - Create a new project
Go to the Studio application menu, click File > New > Mule Project


On the Mule Project screen, specify the project name and click Next.


On the New Mule Flow screen, select the Select to create a new message flow in the project checkbox, and specify the Name, then click Next.


On the Create a Java project screen, use default setting and click Next.


On the Java Settings screen, use default setting and click Finish.


Once the project is created, the Studio opens the Flow editor for the new message flow.


Step 5 - Build the Hello World message flow
Drag and drop a File endpoint from the Endpoints panel to the flow editor 

Right click the File endpoint in flow editor and click Properties

Specify the Path property.

This File endpoint works as the source endpoint, which reads files from the directory that specified in the Path property and puts the files into the flow.

Drag and drop another File endpoint from the Endpoints panel to the flow editor

The two file endpoints are linked with an arrow line that indicated the flow direction.
Right click the File endpoint in flow editor and click Properties


Specify the Path property.


This File endpoint works as the target endpoint, which receives files from the flow and writes them to the directory that specified in the Path property.

Step 6 - Run the Hello World application
Save the project first, then from the Package Explorer right click the current flow and select Run as > Mule Application


Wait for the application to start up, and check the Console shows "Started app..." message without any errors.

Once the application is started, copy a file to the directory specified in the source File endpoint path property. In few second, this file should be moved to the directory specified in the source File endpoint path property.

Now you have a simple Hello World ESB application running in Mule Studio.

Monday, March 12, 2012

JSF Portlet File Download using WebSphere JSF 1.2 Portlet Bridge

This note summarise my experience of JSF portlet file download using WebSphere JSF 1.2 Portlet Bridge.

One approach to implement file download from portlets is to use the JSR 286 resource serving mechanism. In order to make it working in JSF portlets, one needs to mix portlet and JSF programming as there is no direct support of the mechanism from JSF 1.2 Portlet Bridge.

The implementation consists of three components: a portlet class that extends FacesPortlet and overrides the serveResource method; a JSF page that provides use the download link; and a JSF managed bean that provides the file content.

The portlet class

package demo;

import java.io.IOException;
import java.io.OutputStream;

import javax.el.ExpressionFactory;
import javax.el.ValueExpression;
import javax.faces.context.FacesContext;
import javax.faces.lifecycle.Lifecycle;
import javax.portlet.PortletException;
import javax.portlet.PortletSession;
import javax.portlet.ResourceRequest;
import javax.portlet.ResourceResponse;

import com.ibm.faces.portlet.FacesPortlet;
import com.ibm.faces.portlet.httpbridge.PortletRequestWrapper;
import com.ibm.faces.portlet.httpbridge.PortletResponseWrapper;
import com.ibm.faces.portlet.httpbridge.ResourceRequestWrapper;
import com.ibm.faces.portlet.httpbridge.ResourceResponseWrapper;

public class JSFPortlet extends FacesPortlet {

 @Override
 public void serveResource(ResourceRequest request, ResourceResponse response)
   throws PortletException, IOException {

  super.serveResource(request, response);

  TestBean testBean = (TestBean) getJSFManagedBean(
    request, response, TestBean.BEAN_NAME, TestBean.class);

  final OutputStream out = response.getPortletOutputStream();
  byte[] bytes = testBean.getCsv();
  response.setContentType("text/csv");
  response.setProperty("Content-Disposition",
    "attachment; filename=download.csv");
  response.setProperty("Content-length", String.valueOf(bytes.length));

  out.write(bytes);
  out.flush();
  out.close();
 }

 public Object getJSFManagedBean(ResourceRequest request,
   ResourceResponse response, String beanName, Class beanClass)
   throws PortletException {

  PortletSession portletSession = request.getPortletSession();

  Object jsfBean = (TestBean) portletSession.getAttribute(beanName);

  if (jsfBean == null) {
   PortletRequestWrapper requestWrapper = new ResourceRequestWrapper(
     request);
   requestWrapper.setPortletContext(getPortletContext());
   PortletResponseWrapper responseWrapper = new ResourceResponseWrapper(
     response);
   Lifecycle lifecycle = getLifecycle(requestWrapper);
   FacesContext context = getFacesContext(requestWrapper,
     responseWrapper, lifecycle);

   final ExpressionFactory expressionFactory = context
     .getApplication().getExpressionFactory();

   final ValueExpression valueExpression = expressionFactory
     .createValueExpression(context.getELContext(), 
       "#{" + beanName + "}", beanClass);
   jsfBean = (TestBean) valueExpression.getValue(context
     .getELContext());
  }

  return jsfBean;
 }
}

The JSF page

<%@ taglib uri="http://java.sun.com/jsf/core" prefix="f"%>
<%@ taglib uri="http://java.sun.com/jsf/html" prefix="h"%>
<%@ taglib uri="http://java.sun.com/portlet_2_0" prefix="portlet"%>               
<%@taglib uri="http://www.ibm.com/xmlns/prod/websphere/portal/v6.1/portlet-client-model"   
       prefix="portlet-client-model" %>              
<%@ page language="java" contentType="text/html" pageEncoding="ISO-8859-1" session="false"%>
<portlet:defineObjects />
<portlet-client-model:init>
      <portlet-client-model:require module="ibm.portal.xml.*"/>
      <portlet-client-model:require module="ibm.portal.portlet.*"/>   
</portlet-client-model:init>  
 
       
<f:view>
  
  <portlet:resourceURL var="resourceUrl" >
  <portlet:param name="action" value="csv" />
  </portlet:resourceURL>

  <a href="<%=resourceUrl%>">Download CSV</a>
  
</f:view>

The JSF managed bean

package demo;
import java.util.Date;

public class TestBean {
 public static final String BEAN_NAME = "testBean";
 
 public byte[] getCsv() {
     return new Date().toString().getBytes();
   }
 
 public String getText() {
  return "Hello";
 }
}

Some notes are:

- The IBM JSF 1.2 Portlet Bridge doesn't provide a Facelet taglib xml for the <portlet:resourceURL> tag, so the tag cannot be used in Facelet based JSF pages. This issue has been addressed in IBM JSF 2 Portlet Bridge.

- The <portlet:resourceURL> tag provides a var attribute that can be used to export the resource URL. Based on the JSR 286 spec, the exported variable is created in JSP page scope. As JSF code has no access to JSP page scope, the exported variable can not be used in JSF code.

- In traditional Servlet programming, the response.setHeader method is used to set HTTP response heads like Content-Disposition and Content-length, but in portlet, the ResourceResponse.setProperty method is used.

- There are two ways to access JSF managed beans from the portlet code: if the managed bean is a session scope bean and it's already exists in the session, the portletSession.getAttribute(BEAN_NAME) call can be used; otherwise, JSF value expression can be used to get and/or create the bean from FacesContext, as the IBM JSF 1.2 Portlet Bridge doesn't provide any method that the portlet implementation class can directly access FacesContext, some internal code must be used to achieve this.

Thursday, March 8, 2012

File down with JSF applications

This note summarises different ways to implement file download with JSF applications.

Approach 1- File down using Servlet

This approach uses a servlet to serve file download request and the link to the servlet can be implemented by using various JSF components, e.g. commandLink and outputLink.

The servlet based approach is a simply and easy way to implement file down, however, the shortcoming here is the file serving process is outside the JSF life cycle, glue code is required when the download process needs to access JSF faces context and backing beans.

A detailed discussion of the approach can be found from here.

Approach 2- File down using JSF PhaseListener

This approach use a JSF PhaseListener to serving process, an example of such implementation can be found from the Mojarra Scales project, which provides a UI component that renders the download link and a PhaseListener that serves file content, sample usage is shown in below.

<sc:download id="downloadPdf" 
 method="download" 
 mimeType="application/pdf" 
 fileName="sample.pdf" 
 data="#{testBean.pdf}" 
 text="Download here">
</sc:download>

When the Mojarra Scales download component is used to create a download link, it renders a http link on the page with a specific URL format which the PhaseListener is used to identify the file request, once the link is clicked, the PhaseListener serves content in the beforePhase method at the RESTORE_VIEW phase.

By using a JSF PhaseListener, the file serving process is now part of the JSF lifecycle. However, the shortcoming here is the data for download is populated during page render, i.e. the evaluation of the #{testBean.pdf} expression in the above example, even the user has NOT click the download click.

Approach 3- File down using JSF Action/ActionListener

This approach use JSF Action/ActionListener that attaches to JSF commandLink or commandButton to serves file content.

Details discussion on Action based implementation can be found here, ActionListener based implementation can be found from the PrimeFaces FileDownload component.

This is the best approach from my point of view.

Tuesday, March 6, 2012

Use WebSphere wsadmin Jython to customise Web module context root for WAR/EAR deployment

This note explain how to use wsadmin Jython to customise Web module context root for WAR/EAR deployment in WebSphere Application Server.

To deploy WAR/EAR file in WAS WebSphere Application Server, wsadmin Jython provides the AdminApp.install method, where the archivePath parameter gives the full path of the war/ear file, and the options parameter gives various options for deployment, including the context root setting.

AdminApp.install(archivePath, options)

For WAR deployment, the -contextroot option is used, the option value is the given context root.

options = []
...
options.append("-contextroot")
options.append(contextRoot)
...
AdminApp.install(warPath, options)

For EAR deployment, the -CtxRootForWebMod option is used, the option value is a list consists of three items: Web module name, Web module URI, and the given context root. The Web module name and URI values can be set in two ways, using specific values, or using pattern matching:

#Set Web module name and URI with specific values
options = []
...
options.append("-CtxRootForWebMod")
options.append([['My Web Applicaiton', 'my_app.war,WEB-INF/web.xml', contextRoot]])
...
AdminApp.install(earPath, options)

#Set Web module name and URI using pattern matching
options = []
...
options.append("-CtxRootForWebMod")
options.append([['.*', '.*', contextRoot]])
...
AdminApp.install(earPath, options)

Monday, March 5, 2012

Integrating m2eclipse-wtp with IBM Rational Application Developer for Portlet Development

This is a walkthrough for integrating Maven with IBM Rational Application Developer for portlet development using m2eclipse-wtp.

Step 1 - Install IBM Rational Application Developer V8.0.4

Refer my previous notes - Setup a Portlet Development Environment With IBM Rational Application Developer 8

Step 2 - Install m2eclipse-wtp release 1.0.100

1) In RAD open the menu Window - Preferences - Install/Update - Available Software Sites, enable sites listed below,

* http://download.eclipse.org/eclipse/updates/3.6
* http://download.eclipse.org/webtools/repository/helios

2) In RAD open the menu Help -> Install New Software, add this new location:

http://download.jboss.org/jbosstools/updates/m2eclipse-wtp

and select the following check boxes:

* Maven Integration for Eclipse
* Maven Integration for WTP
* Expand Maven Integration for Eclipse Extras folder and select only m2e connector for maven archiver pom properties

Step 3 - Install m2e connectors for software configuration management (SCM)

In my case SVN is used as SCM, I first installed Subclipse V1.6.X from update site http://subclipse.tigris.org/update_1.6.x, then in RAD open the menu Window - Preferences - Maven - Discovery, click the Open Catalog button, and select/install the m2e-subclipse connector.

Step 4 - Setup Java EE and Maven preference

1)In RAD open the menu Window - Preferences - Java EE - Project, uncheck the "Add project to an EAR" checkbox.

2)In RAD open the menu Window - Preferences - Maven - WTP integration, uncheck the "Generate application.xml under the build directory" checkbox.

Step 5 - Add Maven projects into RAD workspace

Use RAD "Checkout Maven projects from SCM" or "Import Existing Maven Projects" wizard to add your Maven projects into RAD workspace.

In my demo project, I have a Maven project that consists of three modules: core, webapp and ear. When the projects are imported into RAD, the m2eclipse-wtp plugin apply appropriate facets to the projects based on the maven project types

Step 6 - Setup EAR project properties

This step is important to use RAD Portlet development features include debug/run on server, and edit WAS deployment descriptor.

1) Right click the ear project and select Properties - Project Facets, select the "Websphere Application(Co-existence)" and the "Websphere Application(Extended)" checkboxes, change the version based on your WAS server version

2) Right click the ear project and select Properties - Targeted Runtimes, select the "Websphere Portal" checkbox.

Congratulations! now you have set up a Maevn based portlet development environment in RAD.

Issues and Solutions

Issue - The EAR project popup menu doesn't show the option Open WebSphere Application Deployment

Solution - ensure in the ear module POM file, the maven-ear-plugin/configuration/version property is set to 5 or up.

<plugin>
  <groupId>org.apache.maven.plugins</groupId>
  <artifactId>maven-ear-plugin</artifactId>
  <version>2.6</version>
  <configuration>
    <!-- generate application.xml version 5, to enable RAD to edit WAS deployment descriptor -->
    <version>5</version>  
    <modules>
      <webModule>
        <groupId>${project.groupId}</groupId>
        <artifactId>demo-webapp</artifactId>
        <contextRoot>MavenDemoPortlet</contextRoot>
      </webModule>
    </modules>
  </configuration>
</plugin>

Issue - Open WebSphere Application Deployment for the EAR project shows error Could not open the editor: An unexpected exception was thrown.

Solution - check the ear project settings/org.eclipse.wst.common.component file, ensure the deploy-name attribute of wb-module has the same value as the Eclipse project name. This can be achieved by two different ways.

1) In ear module POM file, add the build/finalName property, and set the value as the ear module artifactId,

<build>
  <!-- 
    same as the artifactId, which is the RAD project name, and also the    
    deploy-name defined in settings/org.eclipse.wst.common.component    
  -->
  <finalName>demo-ear</finalName>
  ...
</build>

2) During the project import, use the [artifactId]-[version] Name template in Advanced setting.

Issue - Run/Debug the portlet on Server shows error EJPPG0024I: Web application with context root XXX is deployed in the application server but not registered with portal.

Solution - check the webapp project settings/org.eclipse.wst.common.component file, ensure the context-root property of wb-module has the same value as the contextRoot defined in the ear maven-ear-plugin. If they are different, either update the ear POM file, or set the m2eclipse.wtp.contextRoot or the build/finalNameproperty in webapp module POM to update the webapp project settings/org.eclipse.wst.common.component file.

<properties>
  <!-- this must be same as the contextRoot defined in the ear module-->
  <m2eclipse.wtp.contextRoot>MavenDemoPortlet</m2eclipse.wtp.contextRoot>
</properties>